SPICE-GTK源码初解
updating
前边的一篇文章介绍过spice协议,其客户端是基于gtk开发的,能够跨linux windows和OS X。本文尝试从代码细节入手来了解spice-gtk的架构,代码细节和架构都了解清楚之后,开发和移植就是轻而易举的事情了。
1 预备知识
在着手阅读代码之前,应该先对gtk的机制有些了解,参照教程和API文档动手写两个GTK小程序就差不多了,剩下的GTK函数可以等遇到的时候再详细了解。如果你使用VIM来阅读源码,或许你还需要了解下怎么使用cscope这些辅助工具。
2 找到入口
通常阅读程序都是从main函数开始,下面的命令能帮你找到main函数所在的位置。spice-gtk的main函数在spice-gtk/gtk/spicy.c文件里,直接看下面加的注释吧。
grep -n main -r .
int main(int argc, char *argv[])
{

	/*Error reporting system*/
	GError *error = NULL;

	/*定义传入的参数哪些会被接受*/
	GOptionContext *context;

	/*spice和server的连接*/
	spice_connection *conn;

	/*保存配置文件路径和配置信息*/
	gchar *conf_file, *conf;

	/*保存连接时的主机IP,主机端口和TLS端口信息*/
	char *host = NULL, *port = NULL, *tls_port = NULL;

	/*版本兼容*/
#if !GLIB_CHECK_VERSION(2,31,18)
	g_thread_init(NULL);
#endif

	/*spice-gtk*/

	g_print("%s\n",SPICE_GTK_LOCALEDIR);

	gchar *tmp = bindtextdomain(GETTEXT_PACKAGE, SPICE_GTK_LOCALEDIR);

	g_print("%s\n",tmp);

	tmp = bind_textdomain_codeset(GETTEXT_PACKAGE, "UTF-8");

	g_print("%s\n",tmp);

	textdomain(GETTEXT_PACKAGE);

	/*设置信号的对应动作*/
	signal(SIGINT, signal_handler);
	signal(SIGTERM, signal_handler);
	segv_handler = signal(SIGSEGV, signal_handler);
	abrt_handler = signal(SIGABRT, signal_handler);
	fpe_handler  = signal(SIGFPE,  signal_handler);
	ill_handler  = signal(SIGILL,  signal_handler);
#ifndef WIN32
	signal(SIGHUP, signal_handler);
	bus_handler  = signal(SIGBUS,  signal_handler);
#endif

	/*用来爬配置文件*/
	keyfile = g_key_file_new();

	g_print("%d\n",S_IRWXU);

	int mode = S_IRWXU;

	g_print("%s\n",g_get_user_config_dir());

	/*g_get_user_config_dir能找到通常配置文件所在的路径,g_build_filename可以简单地理解为strcat*/
	conf_file = g_build_filename(g_get_user_config_dir(), "spicy", NULL);

	g_print("%s\n",conf_file);

	/*尝试创建spicy配置文件的路径*/
	if (g_mkdir_with_parents(conf_file, mode) == -1)
		SPICE_DEBUG("failed to create config directory");

	//这里尝试做了下修改
	//g_free(conf_file);
	conf_file = g_build_filename(conf_file,"settings", NULL);
	//conf_file = g_build_filename(g_get_user_config_dir(), "spicy", "settings", NULL);

	if (!g_key_file_load_from_file(keyfile, conf_file,
				G_KEY_FILE_KEEP_COMMENTS|G_KEY_FILE_KEEP_TRANSLATIONS, &error)) {
		SPICE_DEBUG("Couldn't load configuration: %s", error->message);
		g_clear_error(&error);
	}


	/* parse opts */
	//爬命令行参数
	gtk_init(&argc, &argv);
	context = g_option_context_new(_("- spice client test application"));
	g_option_context_set_summary(context, _("Gtk+ test client to connect to Spice servers."));
	g_option_context_set_description(context, _("Report bugs to " PACKAGE_BUGREPORT "."));
	/*设置--help-spice的内容*/
	g_option_context_add_group(context, spice_get_option_group());

	/*main_group和其他group的区别是main_group会显示在-help选项里*/
	g_option_context_set_main_group(context, spice_cmdline_get_option_group());

	g_option_context_add_main_entries(context, cmd_entries, NULL);

	/*--help-gtk显示的内容*/
	g_option_context_add_group(context, gtk_get_option_group(TRUE));
	if (!g_option_context_parse (context, &argc, &argv, &error)) {
		g_print(_("option parsing failed: %s\n"), error->message);
		exit(1);
	}
	g_option_context_free(context);

	if (version) {
		g_print("spicy " PACKAGE_VERSION "\n");
		exit(0);
	}

	g_type_init();
	mainloop = g_main_loop_new(NULL, false);

	//建立和server的连接
	//connection_new会new一个spice_connection对象,做一些处理之后将其返回
	//主要需要了解的是_SpiceSession 里边保存的会话信息
	//_SpiceGtkSessioon 里边保存的剪贴板共享和USB重定向相关的信息
	conn = connection_new();

	//用命令行传入的信息设置会话信息,主要是安全 USB重定向 audio方面
	spice_set_session_option(conn->session);

	//设置连接信息,端口 IP等等
	spice_cmdline_session_setup(conn->session);

	//g_object_get能将一个对象的属性取出来
	g_object_get(conn->session,
			"host", &host,
			"port", &port,
			"tls-port", &tls_port,
			NULL);
	/* If user doesn't provide hostname and port, show the dialog window
	   instead of connecting to server automatically */
	if (host == NULL || (port == NULL && tls_port == NULL)) {
		int ret = connect_dialog(conn->session);
		if (ret != 0) {
			exit(0);
		}
	}

	g_free(host);
	g_free(port);
	g_free(tls_port);

	//将标准输入重定向
	watch_stdin();

	//建立连接
	g_print("connecting...");
	connection_connect(conn);

	//如果有连接 则进入事件循环
	if (connections > 0)
		g_main_loop_run(mainloop);
	g_main_loop_unref(mainloop);

	//将keyfile里的配置信息转成字符串并保存
	conf = g_key_file_to_data(keyfile,NULL,&error);
	g_print("%s\n",conf);

	if ((conf = g_key_file_to_data(keyfile, NULL, &error)) == NULL ||
			!g_file_set_contents(conf_file, conf, -1, &error)) {
		SPICE_DEBUG("Couldn't save configuration: %s", error->message);
		g_error_free(error);
		error = NULL;
	}


	g_free(conf_file);
	g_free(conf);
	g_key_file_free(keyfile);

	g_free(spicy_title);

	setup_terminal(true);
	return 0;
}
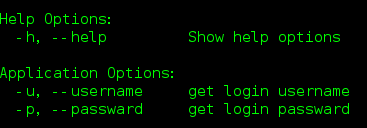
main函数里主要做的是解析命令行参数和建立连接。命令行参数的解析比较简单,可以做些修改,比如将程序默认的选项给改成自己想要的选项。新建文件test.h,编辑如下内容,并在spicy.c文件里include它。
/* -*- Mode: C; c-basic-offset: 4; indent-tabs-mode: nil -*- */ /* * Author:songtianyi630@163.com */ #ifndef CONNECT_CENTER_H #define CONNECT_CENTER_H #includegchar *username; gchar *passward; static GOptionEntry center_entries[] = { { .long_name = "username", .short_name = 'u', .arg = G_OPTION_ARG_STRING, .arg_data = &username, .description = N_("get login username"), },{ .long_name = "passward", .short_name = 'p', .arg = G_OPTION_ARG_STRING, .arg_data = &passward, .description = N_("get login passward"), },{ /*end of list*/ } }; #endif
然后根据下面的代码,做对应的注释和添加就行了。编译并运行,效果见图1
	/*--help-spice*/
//	g_option_context_add_group(context, spice_get_option_group());

	/*Application options*/
//	g_option_context_set_main_group(context, spice_cmdline_get_option_group());

	g_print("%s\n",cmd_entries[0].description);
//	g_option_context_add_main_entries(context, cmd_entries, NULL);

	//添加自己的选项
	g_option_context_add_main_entries(context,center_entries,NULL);

	/*gtk的选项*/
//	g_option_context_add_group(context,gtk_get_option_group(TRUE));

图1 运行结果图
3 文档
开源代码的注释一般比较规范,可以使用doxygen根据源码注释生成文档,便于查看。总结了一个用于生成spice-gtk文档的doxygen配置文件,你也可以参考doxygen的配置文件规则来做一些修改。我是在用doxygen -s -g default 生成的默认配置文件的基础上改的,可以先自己生成一个默认配置文件,然后参照下面的diff结果来做相应地修改。
[root@cloudstack trash]# diff mydoxy default
7c7
< PROJECT_NAME           = "spice-gtk"
---
> PROJECT_NAME           = "My Project"
11c11
< OUTPUT_DIRECTORY       =/home/usr1/trash/
---
> OUTPUT_DIRECTORY       =
17,18c17,18
< ALWAYS_DETAILED_SEC    = YES
< INLINE_INHERITED_MEMB  = YES
---
> ALWAYS_DETAILED_SEC    = NO
> INLINE_INHERITED_MEMB  = NO
25c25
< MULTILINE_CPP_IS_BRIEF = YES
---
> MULTILINE_CPP_IS_BRIEF = NO
31c31
< OPTIMIZE_OUTPUT_FOR_C  = YES
---
> OPTIMIZE_OUTPUT_FOR_C  = NO
45,46c45,46
< INLINE_SIMPLE_STRUCTS  = YES
< TYPEDEF_HIDES_STRUCT   = YES
---
> INLINE_SIMPLE_STRUCTS  = NO
> TYPEDEF_HIDES_STRUCT   = NO
52c52
< EXTRACT_ALL            = YES
---
> EXTRACT_ALL            = NO
55c55
< EXTRACT_STATIC         = YES
---
> EXTRACT_STATIC         = NO
57c57
< EXTRACT_LOCAL_METHODS  = YES
---
> EXTRACT_LOCAL_METHODS  = NO
90c90
< QUIET                  = YES
---
> QUIET                  = NO
100c100
< INPUT                  =/home/usr1/Downloads/spice-dev/spice-gtk/
---
> INPUT                  =
103c103
< RECURSIVE              = YES
---
> RECURSIVE              = NO
105,106c105,106
< EXCLUDE_SYMLINKS       = YES
< EXCLUDE_PATTERNS       = *.py
---
> EXCLUDE_SYMLINKS       = NO
> EXCLUDE_PATTERNS       =
112c112
< INPUT_FILTER           =
---
> INPUT_FILTER           =
114,115c114,115
< FILTER_SOURCE_FILES    = NO
< FILTER_SOURCE_PATTERNS =
---
> FILTER_SOURCE_FILES    = NO
> FILTER_SOURCE_PATTERNS =
120,121c120,121
< SOURCE_BROWSER         = YES
< INLINE_SOURCES         = YES
---
> SOURCE_BROWSER         = NO
> INLINE_SOURCES         = NO
123,125c123,125
< REFERENCED_BY_RELATION = YES
< REFERENCES_RELATION    = YES
< REFERENCES_LINK_SOURCE = NO
---
> REFERENCED_BY_RELATION = NO
> REFERENCES_RELATION    = NO
> REFERENCES_LINK_SOURCE = YES
174c174
< GENERATE_TREEVIEW      = YES
---
> GENERATE_TREEVIEW      = NO
194c194
< GENERATE_LATEX         = NO
---
> GENERATE_LATEX         = YES
207c207
< LATEX_SOURCE_CODE      = YES
---
> LATEX_SOURCE_CODE      = NO
spice-gtk也有自己的官方文档,在源码主目录下执行autogen.sh之后,可以在/doc/reference/html/目录下查看html文档。
4 调试
调试能够更深入地理解程序是如何处理数据的,gtk和spice-gtk都提供了调试选项,调试选项会输出一些调试信息。
但是这些信息显然不够,对于简单的gtk程序,可以在编译的时候加上调试选项-g ,然后用gdb调试就OK,对于spice-gtk的调试本人暂时还未探究清楚(对makefile这类工具还不是很熟悉,而且暂时也没有调试的需求)。
5 结构体
要想了解spice-gtk的数据流,必须知道结构体里存储的数据的作用,它们是如何得到并被处理的。
主函数爬完命令行参数之后,如果用户未传入参数,会调用connect_dialog函数来获取连接信息。得到连接信息之后,会建立连接。连接信息保存在spice_connectiion这个结构体中,其中SpiceSession保存了该连接的会话信息(状态),包括ip,端口,cache信息,usb重定向信息等,SpiceGtkSession保存了剪贴板共享,自动usb重定向等信息。从connection_new函数可以看出整个连接主要有SpiceSession,SpiceGtkSession和SpiceUsbDeviceManager三部分。值得注意的是,spice-gtk对象之间并非是单纯的从属关系,比如SpiceSession里有SpiceChannel,SpiceChannel里也有SpiceSession,且都有指向对方的指针。
struct spice_connection {
	SpiceSession     *session;//会话信息,由spice_session_new创建
	SpiceGtkSession  *gtk_session;//剪贴板,usb重定向等,由spice_gtk_session_get从session中取出
	SpiceMainChannel *main;//由SpiceSession里的cmain转换过来,但是这两个结构体的成员并不一样,目前还不清楚是怎么转的。
	SpiceWindow     *wins[CHANNELID_MAX * MONITORID_MAX];
	SpiceAudio       *audio;//通过spice_audio_get得到
	const char       *mouse_state;//server mouse or client mouse
	const char       *agent_state;//是否使用agent yes or no
	gboolean         agent_connected;//agent 是否连接yes or no
	int              channels;
	int              disconnecting;//状态标记,标记当前的连接是否正在断开,在断开或者建立连接的时候使用
};
struct _SpiceGtkSessionPrivate {
    SpiceSession            *session;//指向spice_connection中的SpiceSession成员
    /* Clipboard related */
    gboolean                auto_clipboard_enable;//自动剪贴板共享,当你ctrl-c的时候,内容会被自动放在共享的剪贴板里
	SpiceMainChannel        *main;//指向spice_connection中的SpiceGtkSession成员
    GtkClipboard            *clipboard;//剪贴板
    GtkClipboard            *clipboard_primary;//?
    GtkTargetEntry          *clip_targets[CLIPBOARD_LAST];//
    guint                   nclip_targets[CLIPBOARD_LAST];
    gboolean                clip_hasdata[CLIPBOARD_LAST];
    gboolean                clip_grabbed[CLIPBOARD_LAST];
    gboolean                clipboard_by_guest[CLIPBOARD_LAST];
    /* auto-usbredir related */
    gboolean                auto_usbredir_enable;//自动usb重定向,插入usb后会自动重定向
本人在读源码的时候遇到了很多让人费解的问题,比如GtkWidget怎么就被宏定义转换成了SpiceDisplay?这些问题主要涉及到gtk的对象系统,可以参考这篇文章。
6 模块
如果只是顺着main函数往下看,很难一直深入下去,因为gui程序很多行为都是通过信号-回调的机制来完成的。这个时候就要分模块来看。要细看模块,gkt就有必要深入学习下了,推荐Foundations of GTK+ Development,精通C也是必要的,推荐C专家编程。